
After we had a running Raspberry Pi with operating system inside, it is time to control our Raspberry Pi remotely. Because we don't want to stuck in a boring place when we configure our Raspberry Pi, do we? So I would like to share about control our Raspberry Pi remotely and configure it everywhere we want as long it has same network between the Raspberry Pi and a controller.
To control our Raspberry Pi, our controller device (another computer or smartphone) must have a same network address with our Raspberry Pi or we can say it these devices must in same Local Area Network (LAN). Generally speaking, we can control our Raspberry Pi using SSH protocol (Port 22 in default).
So, what we can do to control our Raspberry Pi? In this idea, I would like to share my knowing about controlling our Raspberry Pi remotely.
1. The Components
For the needed component we just focus on the Raspberry Pi, because it is the main actor here. For the rest, we can set the configuration automatically.
- Raspberry Pi that already have operating system inside
- Ethernet STRAIGHT cable configuration
- Wireless Access Point
2. The Topology
After all components is gathered, it is time to make our devices in the same network or on same local area network/ To do that, we must make our topology first. The common topology that is used for local network is Star Topology. The Star Topology happen when there is a hub/switch as a center of node is connected to the rest of nodes (computer, laptop or smartphone) around.

3. The Setting
The first thing to be set is the wireless access point. We must configure the IP of access point as a gateway and the distributed IP for the rest of the device. For the configuration, we can refer to the access point manual book. This step is to make the local IP so the devices (laptop, computer, smartphone and Raspberry Pi) is in the same network. In this case I use 192.168.0.0 as local network address.
After that, let's go through to our Raspberry pi configuration. For the Raspberry Pi configuration, I make it a static IP (I used 192.168.0.16) to be easy to remember and if the network accidentally reset by itself the configuration is still the same. Because if we make the configuration by default, when we reset the Raspberry Pi, there is a possibility that the IP will change to another IP address.
To configure the IP permanently, we must edit some lines in file /etc/network/interfaces. Don't forget to backup the file first before we edit it.
To configure the IP permanently, we must edit some lines in file /etc/network/interfaces. Don't forget to backup the file first before we edit it.
sudo cp /etc/network/interfaces /etc/network/interfaces.bak
Then edit the file.
Edit and add some lines focus on eth0 device.
Save the configuration and restart the service.
After that, we must ensure that our Raspberry pi has the ssh service by type ssh on the terminal. But by default the Raspberry Pi already has this service. If our Raspberry doesn't have this service, it will appear an error message.
Then we must install the package.
Congratulation, with these configuration our Raspberry Pi is ready to be controlled remotely via terminal later.
But if we left it like these, we just can control our Raspberry Pi via terminal. There is another way to control the Raspberry Pi via desktop. To make it happen, we must install another service. The service we want to install is xrdp. This service allows us to control the Raspberry Pi via the Raspberry Pi desktop.
Install the xrdp package
Now we can control our Raspberry Pi via it's desktop.
sudo nano /etc/network/interfaces
Edit and add some lines focus on eth0 device.
 auto eth0
 allow-hotplug eth0
 iface eth0 inet static
       address 192.168.0.16
       gateway 192.168.0.1
Save the configuration and restart the service.
sudo /etc/init.d/networking restart
After that, we must ensure that our Raspberry pi has the ssh service by type ssh on the terminal. But by default the Raspberry Pi already has this service. If our Raspberry doesn't have this service, it will appear an error message.
-bash: ssh: command not found
Then we must install the package.
sudo apt-get install ssh
Congratulation, with these configuration our Raspberry Pi is ready to be controlled remotely via terminal later.
But if we left it like these, we just can control our Raspberry Pi via terminal. There is another way to control the Raspberry Pi via desktop. To make it happen, we must install another service. The service we want to install is xrdp. This service allows us to control the Raspberry Pi via the Raspberry Pi desktop.
Install the xrdp package
sudo apt-get install xrdp
Now we can control our Raspberry Pi via it's desktop.
4. The Remote Tools
After we have set the Raspberry Pi so it can be controlled from other device, it is the time to set the controller device. Usually the controller device is always another computer (laptop or PC). But how about control our Raspberry Pi from our smartphone? In this idea I would like to share how to control our Raspberry Pi not only from our computer but also from our smartphone.
The important thing before we control our Raspberry Pi remotely is we must make sure that our controller device and the Raspberry Pi is in the same local Network. To make this happen, we just configure our controller device's network address to be the same as our Raspberry Pi's network address or we can just set our device to automatically obtain the IP address. So we don't have to define the IP address. It will be defined by the wireless access point. Because our access point will distribute the IP address automatically based on the number of active devices.
In this case I assume that we have already set the IP address for the controller device in the same local network as our Raspberry Pi.
Putty
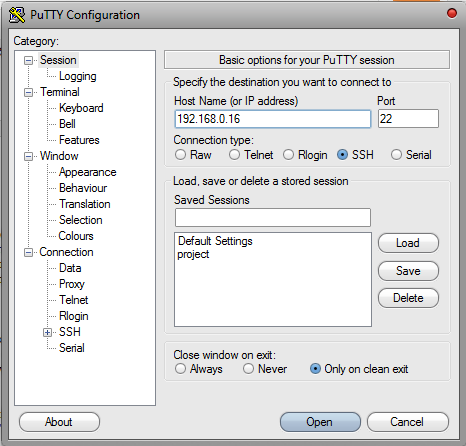
Putty is a portable software. So once we download putty from it's official site, we don't have to install putty to our computer. Just double click on putty icon and it will appears putty window interface.
Input our Raspberry Pi IP address (192.168.0.16) and use port 22 as default post. Then click "Open".

Then we directly connected to our Raspberry Pi terminal and will be asked for username and password. Input our Raspberry Pi username and password.

Congratulation buddy, now we can control our Raspberry Pi from the Terminal.
Remote Desktop Connection
Remote Desktop Connection is Windows built-in program that can control the host computer remotely from host's computer desktop. On Mac, there is a same tool like CoRD. But in this idea I just describe how to control our Raspberry Pi using Remote Desktop Connection. Because I use Wndows.
Open the Remote Desktop Connection in Window -> All Programs -> Accessories -> Remote Desktop Connection.
Input our Raspberry Pi's IP address and click "Connect".

And it will direct you to xrdp login window. Input our Raspberry Pi username and password.

Then we go trough our Raspberry Pi desktop.

Great job fellas, now we can control our Raspberry Pi from Raspberry Pi desktop.
After we download the JuiceSSH app from google apps store and open the app on our smartphone.

Make a new connection and input our Raspberry Pi username followed by it's IP address (pi@192.168.0.16)

Then we will be asked for our Raspberry Pi password.

Input the password of our Raspberry Pi and we directly connected to our Raspberry Pi Terminal

TADA!!! No we can control our Raspberry Pi from our smartphone.
That's all the sharing idea. I hope this will be useful for you. Thanks for your attention.
The important thing before we control our Raspberry Pi remotely is we must make sure that our controller device and the Raspberry Pi is in the same local Network. To make this happen, we just configure our controller device's network address to be the same as our Raspberry Pi's network address or we can just set our device to automatically obtain the IP address. So we don't have to define the IP address. It will be defined by the wireless access point. Because our access point will distribute the IP address automatically based on the number of active devices.
In this case I assume that we have already set the IP address for the controller device in the same local network as our Raspberry Pi.
Control Raspberry Pi from other computer
There are plenty of tools that is used to control our Raspberry Pi remotely. The common tool is called putty and we can get the tool from putty official site. Putty is free and open-source terminal emulator to control the remote device. Another tool that we can use is Remote Desktop Connection. Remote Desktop Connection is built-in program on Windows operating system. From Remote Desktop Connection we can control the Raspberry Pi from the Raspberry Pi desktop. In this idea I would like to try these tools.Putty
Putty is a portable software. So once we download putty from it's official site, we don't have to install putty to our computer. Just double click on putty icon and it will appears putty window interface.
Input our Raspberry Pi IP address (192.168.0.16) and use port 22 as default post. Then click "Open".
Then we directly connected to our Raspberry Pi terminal and will be asked for username and password. Input our Raspberry Pi username and password.

Congratulation buddy, now we can control our Raspberry Pi from the Terminal.
Remote Desktop Connection
Remote Desktop Connection is Windows built-in program that can control the host computer remotely from host's computer desktop. On Mac, there is a same tool like CoRD. But in this idea I just describe how to control our Raspberry Pi using Remote Desktop Connection. Because I use Wndows.
Open the Remote Desktop Connection in Window -> All Programs -> Accessories -> Remote Desktop Connection.
Input our Raspberry Pi's IP address and click "Connect".

And it will direct you to xrdp login window. Input our Raspberry Pi username and password.

Then we go trough our Raspberry Pi desktop.

Great job fellas, now we can control our Raspberry Pi from Raspberry Pi desktop.
Control Raspberry Pi from our smartphone
Another way to control our Raspberry Pi is from our smartphone especially for android. When I tried to search an app to do remote connection like putty, there are a lot of apps that similar to each other. But just one app that have my attention. The app is JuiceSSH. I choose this app because I think it is easy to use. We can download this app to our smartphone from google apps store freely.After we download the JuiceSSH app from google apps store and open the app on our smartphone.

Make a new connection and input our Raspberry Pi username followed by it's IP address (pi@192.168.0.16)

Then we will be asked for our Raspberry Pi password.

Input the password of our Raspberry Pi and we directly connected to our Raspberry Pi Terminal

TADA!!! No we can control our Raspberry Pi from our smartphone.
That's all the sharing idea. I hope this will be useful for you. Thanks for your attention.


